Lat: 18 54.181′ S
Lon: 00 36.476′ W
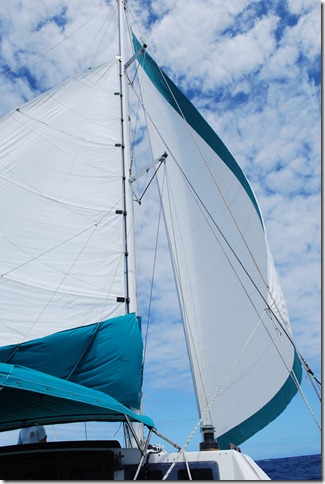
There were two pieces of big news this morning. The first is that we’ve entered the western hemisphere again for the first time since briefly crossing back across the dateline between New Zealand and Fiji. The other is that unlike the last 5 days or so, which have been characterized by light winds and clear skies or small, puffy cumulus clouds, today the sunrise found the sky overcast with mid-level cumulus cloud banks and the wind gathering strength. By 7:30am we dropped the spinnaker and started running downwind wing-on-wing, with the jib off to starboard and the double-reefed main out to port. We don’t often use this point of sail because it can be a little tedious and finicky (especially since our main doesn’t get out very far before it’s blocked by the cap shroud), but it’s been working out OK today as long as we keep the wind almost exactly behind us. For now our speed is back up and we’re only about 10 degrees off course.
 Wing-on-wing (or goose-wing as the Frenchies say)
We haven’t had any more luck fishing, but apparently there are some big ones out here. Yesterday one of the lines came back with no lure, leader, or swivel — the 300 lb test monofilament was broken cleanly.
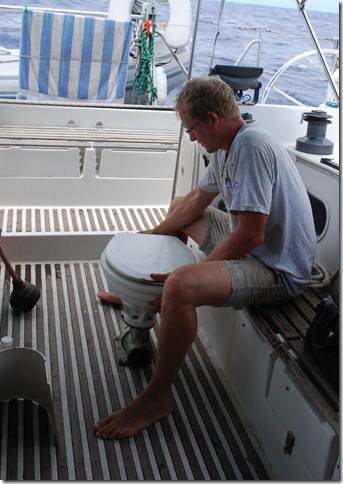
With such calm seas, doing boat work has been almost as easy as it would be at the dock, so with the exception of our damaged spinnaker, this may be the first time that the boat arrives at the end of a passage in better shape than it started. Just in case the sailing life has sounded too idyllic lately (and it really has been) I’ll have to relate the description of yesterday’s repair (see step 9 for the short version). The electric port head has been on and off my list of repairs for the whole trip and when cleaning hoses and the discharge elbow (both joyful jobs) stopped showing improvement, we finally stopped using it and relied on the manual starboard head, which to date has been old faithful. I’d already tried all the easy stuff so I knew that a teardown and pump rebuild was the next step. Here are the basics of how that went: (1) flush plenty of fresh water through the system, (2) remove hoses and discharge fittings (No worries, just mop up the water), (3) remove front cover (Oops, it’s plastic and so old and brittle that it broke into pieces so if the old owner kept a spare we’re saved, otherwise no port head until we can get parts. Spinnaker sheet is over the hatch for the spare parts locker, so just keep going and check later.), (4) unscrew the macerator blade off the threaded shaft to get at the flexible, replaceable pump wall, which probably needs to be replaced (Impossible. The threads are completely caked with hardened build-up and just try getting a tight grip on a sharp round blade in a tiny space and turning it. Half an hour trying to clean the threads doesn’t work, so gonna have to pull the entire pump apart to improve access.), (5) pulling the whole pump requires pulling the whole head, so take off the electrical connections and the intake hose, unscrew the head from the floor and carry the whole thing out into the cockpit for cute photos and the next round of work., (6) now with a bit of work the macerator blade can be removed and guess what, the pump wall isn’t just worn, it’s completely missing! That explains a lot., (7) use a spare line and put a rolling hitch on the spinnaker sheet then cleat off the spare line so I can take the tension off the sheet and fetch spare parts (I’m in luck, the previous owner held onto a used front cover!) (8) try putting the new pump wall in, but it doesn’t fit properly because there’s too much hardened buildup that I’m deciding to call “calcium”, so a nice long session with dental picks, screwdrivers, and sandpaper in barely accessible places is required to see the bronze surface again, (9) now several hours into the job, I finaly install the new pump wall, (10) clean out hose fittings, sand down mating surfaces, and replace several gaskets, (11) the old spare front cover turns out to be labeled “cracked, OK for emergency”, so more scraping and sanding of buildup is needed to make sure that it will go in smoothly and not break during insertion, (12) reassemble the rest of the head, clean off all the mess my scraping has created and carry it back town to re-install it, (13) re-installation goes smoothly until we give it a wet test and find that the discharge elbow with its new joker valve doesn’t want to stop leaking. At this point, it’s time to call it a day. It’s a typical 1-hour boat job that’s become a multi-day project. The good news is that with the new pump wall installed it now sounds like an industrial machine instead of a car’s electric window and dispatches water like we’ve never seen. Once I sort through a couple more leaks we’ll again be a household with two 1/2 baths instead of one.


